Thursday, November 24, 2011

Spanish Lace SWSG


Tuesday of this week (11/22/2011) was the monthly meeting of Sacramento Weavers and Spinners Guild. November is the month that the Guild hosts mini-workshops on various crafts like dying, felting, basket weaving, spinning wheels, and rigid heddle weaving. I took the workshop on rigid heddle weaving with Robin Lynde. She taught us how to the warp rigid heddle loom, Italian Hemstitching, Danish Medallions, some warp floats/weft float technique and she showed me how to do the Spanish Lace technique! That's the sample I did in class up on my Cricket Rigid Heddle loom.

It was a good day!

Sunday, November 20, 2011

Blue Sprang Finished


Before I found my crochet hook, I found a little bundle of tools for sale at the Goodwill Thrift Store. Some crochet hooks, an afghan hook (long hook), some regular and double point knitting needles. All for 4 dollars and the money goes to charity.


The afghan hook is the right size so I used it to hook the middle of the sprang. This will be the bottom of the bag. It was recommended that I should run a string through the middle to make it a non-stretch bottom, but I want to try hooking the middle row. I was surprised to see how the piece shortened. Then I removed the safety strings. Sorry about bad color, flash did not go off on this picture.


Using the extra long edge cords I crocheted up the sides. Then I braided a drawstring and threaded it through the top. Then I saw how the bottom stretched out. Not expected.


Also not expected is how the bag does not fully enclose a bar of soap.


Okay, so I'll do the next one longer, narrower and make the bottom less stretchy.

Have a good day!

Friday, November 18, 2011

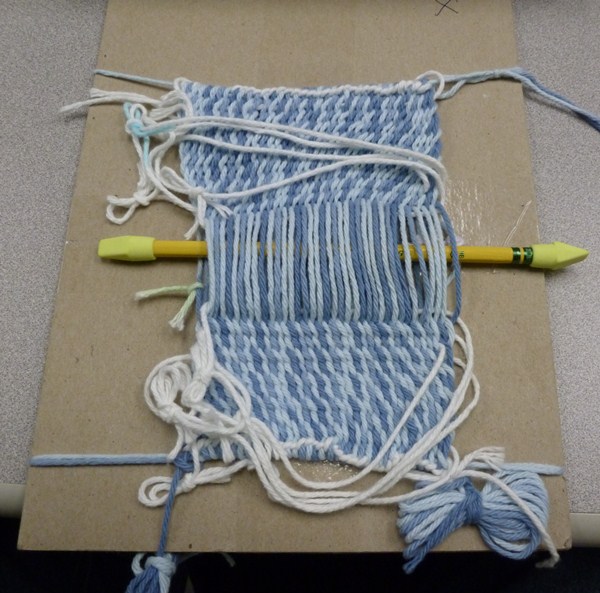
Blue Sprang Pencil


As the two sides of the sprang start to meet in the middle, it is difficult to get the fingers in there to interlink the piece. Can't find the crochet hook so I'm going to link a couple more rows with the pencil. I can work the pencil like it's a finger. That little white string knotted on the right edge is how I mark the edge thread to help me keep my edges in order. After I'm done it will be untied and removed. Easier than using a bead.


Here I am pulling the safety cord through the sprang. I'm going to use two cords each time, one for the top row and one for the bottom row. This may seem compulsive but I use the safety cords to regulate the spacing of the rows so they come out even. I am using cords for four rows on top and four rows on the bottom. After each row I will pull a cord from top and bottom and move it to the middle row. I also left a safety cord near the top and bottom rows to help hold the shape near the twined edges. The twining will come out when I finish this bag.


This is about as far as I can go with the pencil. I think I'll pull a couple of safety cords through it then go find the crochet hook to loop the bottom and finish it. Then find a needlepoint needle to use the extra long edge cords to sew up the sides. This is the first time that I get a real appreciation for the sprang process that builds two rows each time I go across!

Have a good day!

Thursday, November 17, 2011

Blue Sprang Bag


Starting a small sprang bag. Cotton yarn (Sugar and Creme) wound around cardboard while on the light rail train during my commute.


I twined the yarn at top and bottom to keep the yarns in order when I move the warp. The pencil helps hold up off the cardboard while the twining is done.


Using yarn at top and bottom of the piece to hold it in place. The pencil will help hold the layers seperate. Safety strings will help keep the rows protected and will help maintain spacing of each row.


Working the sprang on the bus. The interlinking works on top and bottom rows creating the sprang. My right hand would fit that the group of yarns as I work.


More rows working from top to bottom.


Working more and more rows. It's getting harder to work in the area that is getting smaller in the middle. I need to find my crochet hook to work on this. The erasers on the ends of the pencil help keep the pencil from sliding out during the work. The small bundles of blue yarn (butterfly) near the bottom will be used later to sew up the sides of the bag.

Inspired by the new book "Sprang Unsprung" by Carol James

Have a good day!

Saturday, November 12, 2011

Unsprang Bag Finished


Bag is finished. A braid for drawstring. Bottom is kind of rough with the knots, I may sew it up another row to make it even. Bag is stuffed with a plastic bag for the picture.

Otherwise, not bad.

Have a good day!

EDITED TO ADD:

Somebody asked if this bag expands. Here is the bag flat, about 4 inch wide by 10 inch long.


Stuffed with plastic bags you see how the bag expands in width.

Have a good day!

Unsprang Bag Forming


Above we have the current unsprang (plain interlinking). Size is about 8 inch wide by 11 inch long (20cm x 27cm). This is about half as long as I hoped. There was a lot of shrinkage to the threads. Some threads are very short from being pulled unevenly over the top thread, leaving one end long and one end short, so I have to stop here.


I think I'll fold it over to make a long narrow bag. I'll tie off the bottom, sew up the side, and use a drawstring to close the top. The bag will stretch sideways.


I am knotting the bottom with overhand knots. I'm trying to tie in pairs one thread from each side of the bag.


Then I noticed the FLOATS! See the long diagonal threads? These were on the backside of the piece as I did the interlinking so I did not notice them. As a thread got pushed out of line and grabbed into another line the mistake occurs but was unnoticed by me. These long threads out of line in with the others are called "floats" in weaving and are often part of the design.

Okay, I already have a bunch of knots done. I will finish the knots, trim the strings, sew up the side and turn the piece inside out so the better side is showing outside. The knots will be inside and unseen.

Okay. I'll have to do better on the next one. Got to finish this one first.

Have a good day!

Saturday, November 5, 2011

10 rows forward, six rows back

Oh yeah, this week was 10 rows forward, six rows back.

There was an error. I tried to fix it I just couldn't figure out the
interlinking on all those rows. It was actually less stressful to undo six rows
and start again.

I think I was trying to gather too much of the strings in my fingers and so I
was losing track of threads. I also had trouble with the right side edge
threads traveling too much.

Carol James recommends putting a bead on the outside thread but I just tied a
short piece of yarn with a larkshead knot because I didn't have a bead handy. It
slides when I want it to and stays put otherwise.

So I am back in the zone and I've almost reached the same spot as before. And
everything looks okay.

Have a good day!