A journal of my adventures in the fiber arts. I've played with different wool and fibers, plus different types of weaving, knitting, spinning, felting and more. I tend to gravitate toward primitive types of fiber projects.
Sunday, February 28, 2010
Fingerweaving - Chevron cont.
Chevron continued. I found the interlock in the middle was causing me to lose track of which strands are the middle. I even lost track of one section where I had 3 white one side and 5 white on the other instead of 4 each side. While I found that if I move my outside strands up and away while I moved my "over/under" strands to make them more obvious, it was still confusing in the middle. I remember having similar issues on my larger chevron project last year.
So I switched to the other method, which is to allow the weft strand to go across to the other half of the braid and become a warp on the other side. No interlock to return to the same side.
Here is a close up of the area. Above the white string is the area with the interlock. Below is the area with no interlock, but weft goes to warp on the other side.
Immediately I notice there is no longer a line of bumps down the center where the interlocks occurred. The edges are smoother too. There is also a curve developing on the right side, so I will have to remember to use less tension on that side.
I used variegated color yarn, so it changes color. The pattern repeats every 50 inches so I cut my color strands to 50 inch and arranged the color changes together. I took half the strands and turned them around to get alternating color stripes.
Have a good day!
Wednesday, February 24, 2010
Fingerweaving - Chevron
But then I find I'm having trouble with the interlocking part in the middle.
Since I already have the pictures taken here it is. If you have suggestions let me have it.
Any clue would be appreciated.
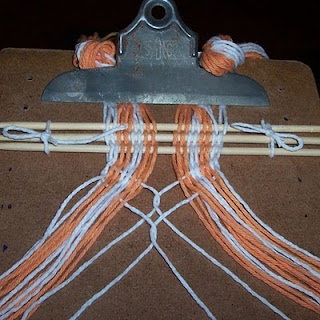
Picking up where we left off on the first tutorial. I setup a fingerweaving twice as wide as the first one. 32 strands total. 16 strands color, 16 strands white. Using chopsticks for the spacing is shown in Carol's James book “Fingerweaving Untangled” and is a good technique.
Setup is 4 white, 4 color, 4 white, 8 color, 4 white, 4 color, 4 white
The technique is sometimes called Outside In. The outside warp is pulled through to the middle area.
Here is after two warps pulled through you can see that I interlock the threads in the middle. This is how the two bands are joined together.
After three warps pulled through, the two sides start pulling together. Be sure to keep track of the outside warp (on right). Grabbing the wrong warp will spoil the pattern.
Here is the band coming together. The center interlocking area needs to be watched carefully. It can appear like total chaos. But as the pattern comes together and the routine catches on the pattern gets more organized.
I firmed up the band, got the tension more even and now the chevron pattern develops.
Here is some more of the braid. The edges are wavy and I'm having trouble keeping the interlocking section looking neat. Somewhere I missed an over/under pair and now it's hard to figure where the two should cross.
So that's where I'm at now!
Keep braiding.
Have a good day!
Friday, February 12, 2010
Sacramento 13 St & Sacramento River
More notes from my corner of the world: Sacramento Calif, 13th Street
(click on pictures for larger view)
These are things that I see on my way to work on public transit. Above you see the whimsical painting of a Beefeater who greets visitors to an apartment building on 13th Street.
Walking 13th St toward N St, this is the back of the Westminster Presbyterian Church. A beautiful old building capped with red tiles, I like the dome, the bell tower, the chimneys and roofs surrounding it.
Here is the 13th St side of the church, I like the big medallion window.
There's a little roadway that bisects Capitol park at 13th St. This is a view of the State Capitol building. The park has trees and plants from all over the world and many of them have signs to tell what they are. There are also statues and monuments that we will see on future postings.
I walk about six blocks from the light rail stop to the bus stop to go across the river into West Sacramento. I could use another stop that is only a two block walk, but I need the exercise and it does not go through the park.
Here is a view of the Sacramento River from the bus as I go over the Tower Bridge, looking toward the "I" Street bridge. You can see the excursion boats at the docks the right. The big boat is actually a paddle wheeler that is permanently docked there. It serves as restaurant and hotel. The water is very high from over two weeks of rain in the area.
The big building on the left is new and part of the development going on in West Sacramento.
That's all for today from my corner of the world.
Have a good day!
Thursday, February 11, 2010
FingerWeaving: Diagonal/Candystripe tutorial
Fingerweaving Tutorial – Flat Weave: Diagonal/Candy Cane Stripe
Weaving without a loom
By Franco Rios
Weavers language:
Warp: threads that are vertical
Weft: threads that are woven horizontally in and out of the warps
Shed: the space between upper and lower warps where weft goes through
The yarn is Peaches & Creme and Sugar N Cream cotton yarn, 4 ply worsted, thickness is 12 wraps per inch (WPI). It's not expensive in USA. You can use acrylic yarn or acrylic/wool blend if you have it. You need about 16 to 18 feet of it.
I wrapped each color 8 times around the clipboard which is about 12 inch long.
I cut the yarn so I have 8 pieces of each color, about 24 inch long. Then I arranged the yarn together so I have a 24 inch long bunch of yarn with 16 pieces total.
I arranged the threads into groups of red and white. I clamped the middle of the bunch, letting one half hang down the front of the clipboard and the other half hangs down the back. You can put a loose knot in the half you are not weaving to help keep threads from sliding.
Taking the first yarn on the right, I start the first row by weaving it through the yarns hanging down the front. I make sure I go over the second yarn on the right, under the third, over the fourth and so on until I come out the other side.
I start the second row by taking the next yarn on the right, which has now become the first yarn, over the second yarn, under the third and so on. Notice how the white yarn from the first row goes under the yarn from the second row.
I start the third row by taking the next yarn, I go over the second yarn, under the third, over the fourth and so on. Notice how the yarn from the second row now goes under the yarn from the third row.
To help you see how the yarn is woven, I've left it very loose in the pictures above. Normally you would tighten up the weave so it is narrower and the rows are closer together. Notice how the color is migrating from one side to the other.
By raising the upper and lower threads, I can show you the area called the "shed" where the "weft" goes. The weft is the yarn that goes across the "warp." The warp is the name for the vertical yarns.
I use two hands to manipulate the yarns over and under to make the shed for the weft to go through. My left hand holds the bunch of yarn on the left as my right hand picks the upper and lower yarns to weave through. Notice how the warp is kind of bunched together and it covers/hides the weft going through it. This is called warp faced weaving since the warp is what shows on the face of the cloth. After picking the upper and lower threads, I pull the weft thread through the shed.
Here is the weft pulled through the warps. The thread on the right is going to be the next weft to be pulled through. The thread on the left is the weft going across the warps and will become a warp on the next row.
When I got close to the end, with about 4 or 5 inches to go, I have to decide how to finish this braid. When I had two red yarns left on the right, I tied the last two yarns on the left with a loose knot to hold them in place. Then I took the two red yarns on the right and the two white yarns on the right to make a four strand braid to be tied off with an overhand knot. Then the next four yarns are white. Then two white and two red make a braid. Leaving the last four red yarns to make a braid. The four strand braid is often called “chicken track” because of the vee shaped pattern.
The other half of the flat weave is hanging on the back side of the clipboard. So I turn the flatweave around, with the same side up, I don't flip it. The starting thread must on the right and the exit point is on the left. Now the unwoven yarns are hanging down the front of the clipboard. I start weaving again to the other end. If you put a loose knot in the other half, now is the time to remove the knot so you can weave that half.
Here is the finished flat weave, braided on both ends. You might use this sample as a handle for a bag or sewn as decorative feature on another item. Once you understand the basics you can create longer and wider pieces.
Have a good day!
Franco Rios
If you have any questions, please join us on the FingerWeaving yahoogroup
http://groups.yahoo.com/group/FingerWeaving/
Be sure to check the list of Links (click the word Links at group home page)
to view other websites with information
For another diagram showing the weaving method goto
Carol James Sashweaver.ca website, see the four pictures in middle of page,
click pic on the right side for a diagram of finger weaving
http://www.sashweaver.ca/resources-book.html
This tutorial is also available for download as PDF
http://www.rabbitgeek.com/file/diagonalstripetutorial.pdf
Tuesday, February 9, 2010
Toba Loom Adventure
Do a search for "telar toba" and you will get many hits on spanish language websites (telar = loom in spanish)
Beautiful weaving and very good looking looms. Use the "translate" feature on your web browser to get a clue.
edited to add:
I highly recommend this site:
http://angeltelar.blogspot.com/2008/09/especial-telar-tobatcnica-bsica.html
Includes a tutorial on weaving on the toba sash loom with details of the construction that shows everything you need to see to make your own loom.
It's in Spanish so get your spanish/english dictionary out.
The tutorial is a picture file so you can't copy and paste the text into a translator, you would have to type it all in.
Buenos dias!
Monday, February 1, 2010
Supplementary Weft Pattern
Laverne Waddington has a blog on backstrap weaving where she recently posted a tutorial on Supplementary Weft Patterning (SWP). Click here to see the blog -> Backstrap Weaving Blog
Above is my first try at SWP. Using 18 WPI crochet thread on my clipboard loom, I started with single thread for the supp weft, but the result is thin. The warp thread is 3 times as long as wide so a single thread is a tiny horizontal line on a single warp. It looks like a tiny dot.
Then I spotted the instruction where Laverne said she doubles up the thread and usually floats the SWP across two warps, making a thicker dot. so you can see where I started doing that closer to the center.
By the time I started to get the hand of it, I was at the middle so I turned the loom over and started from the other side. As you can see the pattern looks more organized and bolder using the doubled thread for weft pattern. I can see why embroidery floss would work well since it is not tight spun like thread and it would spread out to fill the warp space.
That's all for now.
Have a good day!
Warp frame modifications
Warp Frame Modifications - I've warped many pieces of continuous warp on sticks tied to the frame. It's cheap and easy, but tedious to tie and untie for small pieces.
So I drilled holes into the sides of the frame. Push the 3/8 inch sticks through the 1/2 inch holes, use string to keep sticks from sliding out sideways. I tried 3/8 inch holes but the holes were not perfectly straight and sticks did not point directly to the hole on other side.
Warp is quickly wrapped on the extending rods.
A bit of coat hanger wire is used to hold the warp to the larger dowel for a smoother end finish. The dowels are slid off to allow me to move the warp to the clipboard loom.
Have a good day!