A journal of my adventures in the fiber arts. I've played with different wool and fibers, plus different types of weaving, knitting, spinning, felting and more. I tend to gravitate toward primitive types of fiber projects.
Friday, October 28, 2011
Sprang Close Up
Sprang close up: Moving from right hand toward left hand, reach across to the next string in the back row and pull it forward.
Note: The white strings along the right hand side and running horizontally through the piece are the safety strings. The strings keep the work from unworking itself and helps establish even spacing. Using strings of different thickness can adjust the spacing. Sticks are often used in traditional sprang to hold the twist and patterns. The strings and sticks are pulled out as work progresses and are not part of the finished piece.
Moving from right hand toward left hand, reach across to the back row and pull it forward. Put finger where the two threads cross.
This picture shows the progression from the right side and how the threads cross. When I'm done working a section, I'll pull a safety string to hold that crossing point of the threads. That point is usually referred to as "the cross" by weavers and fiber artists.
Moving from right hand toward left hand, reach across to the back row and pull it forward. Put finger where the two threads cross. See how the front and back threads are held separated by fingers. Keeping the strings in line and under some tension is important to proper interlinking. I work in sections of however much my fingers can hold at one time.
You can see some more of the structure in this picture. Moving from right hand toward left hand, reach across to the back row and pull it forward. Put finger where the two threads cross.
Repeat until satisfied.
You can read more about sprang in the new book "Sprang Unsprung" by Carol James
(shameless promotion of my friend's book)
Have a good day!
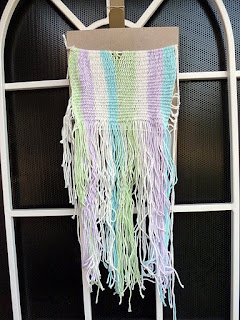
Sprang Progress
Here is the current state of the sprang this morning. Working my way down the strings. It's about 20 rows so far so I probably have 40 more rows to go. But the work is progressing.
A closer view. I am using safety strings to hold the row spacing. I have the safety strings anchored with lark's head knot to a holding string on the right side. I tie the left side ends of the safety strings with slip knots. There is ten rows held in position by string. I pull the safety strings from the top and move down the holding string. The strings are very important to keep the rows intact since I put the piece into a plastic bag and then jam it into my commuter bag for travel. Above the strings is the sprang web, holding shape nicely.
Here I am stretching the sprang web a little bit so you can see the structure of the mesh. I'm trying to work patiently for the best possible result on this piece. I can getting faster. A row takes about fifteen minutes now. There are no shortcuts to this simple process. It must be perfect or there will be holes in the web.
Patience comes to those who wait.
Have a good day!
Thursday, October 27, 2011
3 rows back
Four rows forward, 3 rows back. Been working one or two rows at a time, trying to get it perfect. And then I realized I had purple drifting into the blue stripe on the right. Take all the rows back to where it went wrong. The bottom four rows.
With practice I can now un-sprang as fast I can sprang.
Have a good day!
Friday, October 21, 2011
Nalbinding on the web
(Picture from Videoita Venäjältä - From Russia! )
Nalbinding, another interlinking fiber art.
Nalbinding on Vakerrysta blog.
Click on the link, scroll down to english text.
http://vakerrysta.blogspot.com/2011/10/videoita-venajalta-from-russia.html
But Valerie says: Better still! Go to
http://www//sites.google.com/site/neulakinnas/link/video
for videos on all stitches, by Sanna-Mari. Wonderful.
Have a good day!
Thursday, October 20, 2011
Looks like sprang
I got a few more rows done today. I've had to un-sprang a row a couple of times. I'm learning to spot problems sooner and unsprang less.
I started untangling the loose ends. The area on the right has been untangled but look at the left side. See the mirror image of the sprang below the top rows. Looks like sprang.
Have a good day!
Wednesday, October 19, 2011
More Sprang on bus
Here is my sprang. I used a plastic bag to contain it when I put it away in my commute bag. Or man purse, whatever. I notice that the cardboard strip is going to make the first row too "loopy" when I finish.
So I take out the strip and un-sprang what I did. Then tighten up the strings up to the header string. It looks a lot better.
I started using string as space holders. I may regret using such a tight weave, but for now I like the look better.
More in the future.
Have a good day!
Sprang Unsprung on the bus
Starting a new Sprang project for Weavolution's "Halloweave" challenge. My first challenge is to unsnarl the start of this cotton yarn. I'm planning to make a small bag and the only time I can make for this is during my commute to work.
I'm using a small booklet to wind my yarn in kind of a figure 8 pattern. See the new book by Carol James titled "Sprang Unsprung." Sprang as traditionally taught is done on a continuous looped warp. But in Carol's book, the first thing we learn is that sprang can be done with free ends. That makes my project possible on the train/bus/train routine of my daily commute!
At work during lunch break I cut one side of the V shape loops. This gives me yarn ends that are roughly twice as long as the booklet. Which is the size I wanted for the bag.
Using the Sugar and Creme self striped dyed yarn allows me to work with stripes in shades that mix well with each other. That cardboard on left is my frame for this work. I'll loop a string around it to hold my sprang.
Here I have hung the yarn on the header string. The cardboard frame is 4 layers of 8-1/2 by 11 inch card stock (thick) that I taped together. I also cut some narrow strips of cardboard to help keep the different rows of sprang separate. See the "safety string" that gets pulled through as I work to help keep the rows separate.
Back on the bus, all the elements are in place. And now the goal is make a bag out of plain sprang. More to follow later.
Have a good day!
Thursday, October 13, 2011
Hawks Go To Church
Morning comes softly over the Westminster Presbyterian Church in Sacramento. And now the drama begins.
The pigeons on top of the tower are flushed by a Red Tail Hawk (red arrow) trying to grab a fly by breakfast. Unsuccessful.
Here comes the other hawk (red arrow) hoping to nab a pigeon who hasn't seen the memo about the breakfast fly by. Again unsuccessful.
The pair of Red Tail hawks are having a meeting in a nearby Sequoia tree to discuss the breakfast situation.
As the pigeons settle in catch some more rays on the roof of the tower.
They are once again disturbed by a hawk on another breakfast fly by, note the dark blur on the left side of the pic. Unsuccessful.
I expect the hawks can do this all day. I want yell at the pigeons. I want to tell them to become Catholics and move to the roof at the Cathedral of the Blessed Sacrament!
10/15/11 Edited to add this sequence:
A new morning. The hawk makes a breakfast fly-by.
And snatches a pigeon off the roof of the tower.
And flies off with it to a nearby tree. Pigeon fans do not fear. Because a few moments later the pigeon broke loose and flew out of the tree. Hopefully wiser.
I like my new camera. Its a Lumix with 16X zoom and a bunch of features that make it a little magic picture box.
That's my corner of the world!
Franco Rios
Sacramento, Calif.
Wednesday, October 12, 2011
Repper
This lovely art is made from my beach angel. I put a regular picture into the Repper demo site and fooled around with it for a few minutes and TA-DAAAH!
Here is the source picture of my lovely wife AKA beach angel.
The Repper program plays with patterns and offer free demonstrations on their website. The even allow you to save your art as a low-res sample.
Try it! Visit http://repperpatterns.com/
Have a good day!
Saturday, October 1, 2011
Loop Braid Tutorial
(picture from tutorial doc file)
Loop Braiding Tutorial by Ingrid Crickmore
The Braid Society (UK) has posted a new tutorial for the month of October on the Braids and Bands yahoogroup.
You will need to register onto the yahoogroup to access the files. Registration is free.
http://uk.groups.yahoo.com/group/braids_and_bands/
The tutorial PDF files have been uploaded to the group Files area by Ingrid Crickmore. If you ever wanted to try your hand at loop braiding this is a golden opportunity to learn from one of the rock stars of fiber arts. Ingrid has been exploring and teaching braiding for years. Her plain speaking style will cover all your questions and she has included plenty of pictures for visual learners which includes a lot of fiber artists. Her tutorials also include instructions for left handers. That rocks!
There will be additional braid instructions posted during the month as people progress in their braiding practice, working up from 2 loop braids, 4 loop, 6 loop, 8 loop, then finally a 3 loop square braid.
You can read Ingrid's introduction at the group
http://uk.groups.yahoo.com/group/braids_and_bands/message/1057
You can view more of Ingrid Crickmore's work at her blog
http://loopbraider.wordpress.com
Also visit The Braid Society website
www.braidsociety.com
Have a good day!
Franco Rios
Sacramento Calif.
Subscribe to:
Posts (Atom)