Wednesday, April 28, 2010

Keys to Weaving Pics

I found this reference on the Schact Spindle blog:
http://www.schachtspindle.com/blog/labels/Mary%20Black.html

Jane Patrick writes:
Anyway, I was lamenting to a friend about all of the great weaving books that are now out-of-print. She mentioned a bit of good news: The photo illustrations for Mary Black's New Key to Weaving can be found on-line through the Canadian archives.

Here's the link. http://www.gov.ns.ca/nsarm/virtual/black/Results.asp?Search=cs

The REALLY good news is that these photos are in color and better than the original printed book copy.


Monday, April 26, 2010

Rigid Heddle Beginner Project info

*from my Weavolution Weavealong of Sept 09*
http://www.weavolution.com/node/5563

Welcome to the Beginner RH project
We're going to create something using warp stripes. The concept of warp stripes is to warp your loom with a base color to use as warp and weft. But to add some visual interest and style, we will use a contrasting color for some of the warp threads and will create warp stripes.
First thing is to decide what yarn will you use. If you use cotton, you can make place mats or dishtowels.
If you use wool, maybe you would like to make a scarf.
If you use acrylic, maybe you would to make a scarf, or place mats, or fabric to sew into a bag?
The following is from my blog, where I posted some of this info prior to this weavealong.


Here's the beginning of my next project. I'm going to make some cotton yarn dishtowels/placemats. The real goal is to get some practice on making nice edges and to get some pictures I can use for a weavealong tutorial. I'm going to weave the towels 16 inch wide by 27 inch long with the fringe. With about 10 percent shrinkage during wet finish (washer/dryer cycle) I'll have towels that are 14 inch x 24 inch.

The supplies: Erica rigid heddle loom, 8 dent heddle, two shuttle sticks, a pick up stick, white Peaches & Creme worsted cotton yarn, Sugar & Creme Hot Green, Hot Orange, Hot Blue colored yarn for the stripes. I used up a lot of green and orange on other projects, so I'll be trying to make minimal stripes on this project.

The project is 16 inch wide x 8 thread per inch for 128 ends. I'm going to have 4 ends each of each color for a small stripe x 2 stripes for 24 ends of color and 104 ends of white. I started out by measuring out the warp on the warping chairs.

*continued from previous message*

These are my warping chairs. I'm going to weave two towels on this warp, 28 inch long. That's 56 inch. Plus 18 inch loom waste. That's 71 inch per warp thread. The top chair posts are 18 inch apart. The tops of the chairs have been moved to 53 inches apart. Each time I go around the four posts, I have enough yarn for 2 warps. 12 times for the colors, 52 times for the white.

(sorry for the fuzzy pictures) Here I have cut the warp at the corner post and I have all my warps cut to the right size.

Then I hang the warps on a hook on the wall. The way I warp is probably more labor intensive than others, but it works for me.


I am working from the back of the loom toward the front. I take a warp off the wall, loop it over the back loom bar, dip the cut ends into the glass of water, make a point on the end of the yarn and thread through the hole and slot in the rigid heddle, working from the middle to the outside.


Here it is all threaded up. There is an 8 thread white border each side, 12 threads of color each side and all white inside. The weft will be all white. It takes about about three hours from beginning to this point. Save until tomorrow.

Next, I laid out the warped loom on the floor. I open up some brown paper grocery sacks and cut them up so I can use them to wrap around the warp as I roll the warp onto the loom. As the warp goes around the loom bar, having paper to separate each layer helps the warp stay on the same level, allowing for even tension on the warp. Without a separator, the warp can be high and low on the loom bar, allowing for uneven tension.

So I comb out the warps with my fingers to be sure there are no tangles before I roll the warp onto the loom bar.


In order to get some resistance, I tied the warps to a weight (the bar stool) so the warp has something to pull against while I roll the warp onto the loom bar. I am warping on the floor this time. I usually enlist the aid of a boy to assist me while warping on the kitchen table. I can usually find one of my sons in the kitchen or on the computer, but I'm trying to do this solo as to explore possible solutions to problems.

This worked okay. In the past I've tied soup cans to the warps bunches and hung the warps over the edge of table. That was okay, but not great. If I find a great way to get resistance on the warps by myself, I'll post it. Spent over an hour playing with the paper and rolling the warp. Call it a day.

After a few days not weaving, I jumped back to the loom and started off. I forgot to take pictures of how I did the tie up on the loom. So here is the front loom bar. Notice the big loops?! That will come back to bite me later at the other end of the warp. Because I came up short a few inches on the other end! Because I used so much warp here on the tie up I ran out of yarn on the other end of the warp. So remember to wind your warp up as high as you can with as little knots on this end as you can.

I wound the warp on as tight as I could to the warp beam (the far one). Then I tightened the knobs on the cloth beam (the near one). Then I tightened up the warp beam again. There was a little bit more slack in the warp beam then on the cloth beam.

I use shoelace knots when tying onto the cloth beam so I can untie and re tie as needed. Its very important to get the warp as evenly tight as you can. Uneven tension leads to uneven weft rows and wobbly selvedges on the sides.

Especially important is the outside inch or two on each side of your work. So be sure that your warp stays straight on the warp beam and that each warp layer is firmly on top of the layer below it under the paper. If the warp spreads out, the top layer has no layer below to support it and it falls down, creating loose warp on the outside warps.

So take some time to work on good tension, getting it evenly across the whole width.

That's it for now. You can read the whole weavealong on the Weavolution website.

Go to http://www.weavolution.com and register (it's free)

Then join the Rigid Heddle group to view this thread

http://www.weavolution.com/node/5563

Have a good day!

Sunday, April 25, 2010

Clasped Weft


Continuing the sampler weft from the class I took at CNCH.

One of the techniques practiced at Syne Mitchell's class was Clasped Weft. A weft comes from the right side, grabs another weft from the left and pulls into the middle. Loom is a Schacht Cricket. The Clasped Weft has two wefts in each pick so the weft color dominates. My camera is still failing me, so I will describe.

The pink weft from the right goes through the shed to the other side. The pink now grabs a loop from the blue and pulls across to the middle. By moving the meeting point you can change the spot where color change happens. Because of the two threads looping each other there is usually a bump where the two wefts meet.


As you can see, I kind of fooled around with placement of color. I had to change a weft in the pink and that is the two ends you see that have popped up. After I wash this piece I will clip those threads off. The left edge selvedge is fairly straight, but I am having a bad time with the right edge. Somehow the warp got loose on about twelve threads.


I have pushed a ball point pen onto the back beam to take up some of the looseness. It helps, but I may need to put a thicker pen for the next round. I will be weaving about 10 inches of each technique until I get to the end of the warp.

Have a good day!

Thursday, April 15, 2010

CNCH Rigid Heddle Sampler


(click pictures for larger image)
This is the sampler I wove in Syne Mitchell's class at Conference of Northern Calif Handweavers conference at Santa Clara. The class was called "Rigid Heddle: Beyond Plain Weave"

We were told to bring a rigid heddle loom warped with 3/2 perle cotton on a 12 dent heddle or whatever we have, 8 dent with worsted yarn is fine too. I warped up with 3/2 cotton. Loom is a Schacht Cricket.

I used a #3 crochet yarn as weft. I just grabbed these colors since they were the right size and looked like they would go together. One of the other weavers called it the "Hello Kitty" sampler.

Syne is a very good teacher. The mistakes in the weaving were all my fault, not a reflection on the skills of the teacher.


Syne started with Leno lace and Brooks Bouquet which are weaver manipulated weaves. The split level bouquet is a variation I haven't seen before and I think I want to try that. The Spanish Lace is badly done, but that's my fault, not Syne's. I included a picture below of Linda's Spanish lace which looked like it is supposed to.

The clasped weft is easy and fun. The sides are kind of loopy, but I was trying get a feel for how much weft to weave in.


This is Linda's Spanish Lace with ribbon which looks like it is supposed to. Linda also has some Brooks Bouquet at bottom of picture done every four strands and in middle of picture is Brooks Bouquet again as intermittent accent.

This next group is made up with pick up technique. The trick is to pick up warps from behind the heddle with the heddle down and only warps in slots, not holes.

The warp float mistake is what happens when you leave the heddle up for pickup. It doesn't look that bad actually. It could be a feature in another piece.

The next item is Warp Float Lace, 1 warp up/1 warp down.

Window Pane is same but 1 warp up/2 warp down.

The warp float lace won't look right until it's wet finished. I have a couple more yards of warp to weave before I cut it off and wash it.

Next is a supplemental weft technique using extra yarn for added interest. The extra yarn is laid down under the warp floats (1 up/2 down).

The Honeycomb technique uses 5 up/5 down with a thicker supplementary weft yarn inserted.

So these the techniques beyond plainweave and I'll be practicing in the future.

That's all for now.
Have a good day!

Tuesday, April 13, 2010

CNCH Santa Clara Vendors


Did somebody say Alpaca? There were vendors covering everything from A Star Alpacas to Yolo Wool Mill. These alpacas are taking a break. They worked very hard.


This is Unicorn Books and Crafts.


This is Gilmore Looms.


This is Glimakra USA. That loom in the front right is the Julia. I think I might need one.


This is Northwest Looms. I think I might need one of these too.


I forgot whose display this is, but this is only one of dozens of wonderful yarn displays at the hall.

Following standard procedure for looking at a show, I walked all around the floor to see all the booths before going back to linger at the ones that piqued my interest.

I took a lot of pictures, many did not come out. They were blurry. I need a new camera. CNCH had a great fashion show, weaving competition, craft demonstrations, spinning demonstrations, a boutique with items by CNCH members, and more.

Edited to add:
I forgot to mention that The Braider's Hand (braidershand.com) from Washington state was in attendance with an attractive display of tools, yarn and thread.

There was also a very talented woman who was demonstrating how to braid using loops. Ingrid Crickmore is a member of the Braid Society (www.braidsociety.com). Her samples on display were fantastic. She had people braiding good looking cords in minutes. A good teacher.

You can find a list of the suppliers on this web page
http://www.cnch.org/resources/suppliers/

Have a good day!

Sunday, April 11, 2010

CHCH Santa Clara

Conference Of Northern Calif Handweavers had their annual conference and show this weekend. I went on Saturday to attend a class and check out the exhibits and vendors.

I met Laverne Waddington there who made it possible for me to attend a rigid heddle weaving class taught by Syne Mitchell. (thankyou-thankyou-thankyou Laverne!).

A lot of nice people in the class. Peggy Osterkamp (yeah, Peggy who writes weaving books) was at the table in front of me with a Cricket rigid heddle. Those of us with Crickets were thrilled to be able to show her a tip on using string or a rubber bands on the heddles to keep them from tipping. A trick I learned from Patty Anne's Place, see the video a Cricket Loom Fix.

I had a problem with camera again and did not get all the pictures I tried to get.

So I'm going to borrow a couple of pictures that Laverne took.


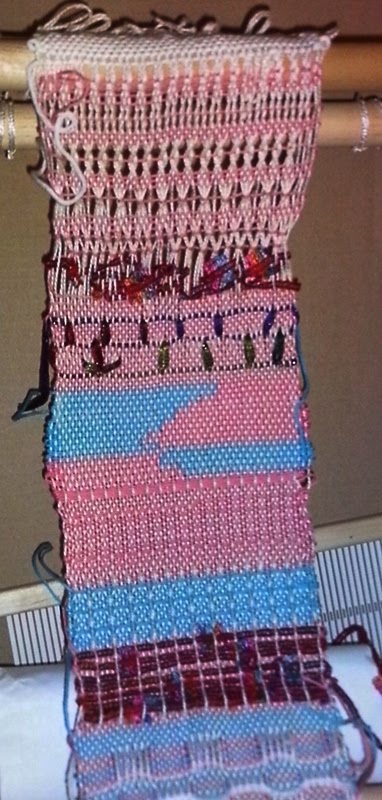
Here I am weaving on my Cricket rigid heddle. That's Linda sitting next to me. She's an experienced weaver on multishaft looms, but she has this older model Erica rigid heddle that she is weaving with Sugar and Creme cotton yarn on a 8 dent heddle. Erica's are a cool little loom if you can get past the eccentricities. I had one in the past and I found it was good for weaving towels.

Linda's experience in weaving really comes through in her RH weaving, because she knows what she wants it to look like and she makes sure it looks how she wants it. (Did that make sense?)


This is a picture of me with Syne Mitchell. She's holding my clipboard loom and she's telling me she would have liked to put that on Weavezine as an article! So if I have another good idea, I'll have to talk her first. You can check out Weavezine at http://weavezine.com/

Here is my latest trick. The 59 cent loom bag from IKEA.


If you shop at IKEA you can buy these big plastic shopping bags for 59 cents. We have a few at my house and since I did not want to take the Cricket loom in box, I put it in the IKEA bag.


As you can see, the loom fits, as well as some sodas, some trail mix, my clipboard loom, extra yarns, the books I bought, some fruit, and a sweatshirt. The bag has short handles and it has long handles that I was able to sling over my shoulder, even though I’m an Extra Large shirt kind of guy

I brought home literature, some books I bought, some catalogs, and a Weavolution pin! I also got to meet Aunt Janet and Tien from Weavo!

More pictures later.

It was a good day!

Thursday, April 8, 2010

Drum Carder - Strauch Petite

*from Jan 2009 notes*
I hand carded with big slicker brushes for dogs.

Then I gave my lovely wife permission to buy a Strauch Petite drum carder. Great little drum carder. It's also the lowest cost (new) model Strauch makes.

We watched for used drum carders on the internet but apparently no wanted to sell a used one when we wanted to buy one last year.

So we bought it new with the brush attachment. I really like the brush attachment.

We wanted fine teeth (standard on Petite) because we have angora rabbit wool to blend.

Also works with angora goat (mohair), sheepwool, alpaca fiber.

Have a good day!

Saturday, April 3, 2010

Graciela Foradori Blogs - Sprang, Gasas & more!

I am moving this comment from Graciela Foradori of Argentina to the top of the blog.

Hallo Franco!!!I am working on sprang
I put a cord after any interloking o interlacing sprang.but I remove them after the work ends. Only the last cord remains to hold the warps.
I invite you to look at my blogs.
Have a good day! Do you speak Spanish?
Graciela, from Argentina
Te invito a visitar mis blogs

http://www.gracielaforadori.blogspot.com/
http://gracielaforadoritecnicastextiles.blogspot.com/
http://vistiendoarte.blogspot.com/
http://www.flickr.com/photos/gracielaforadori/ (sprang, gasas/gauze)

Back to Franco: I have spent the last hour reading the blog and enjoying all the photos and information. There is sprang, there is old backstrap weaving pictures and sculpture, there is gauze (gasas, leno lace).
There are purses, bags, shawls, vests, it is like a candy store for the eyes!

Bravo Graciela!
And thank you for sharing these wonderful things.

For the NorteAmericanos like me who have not learned Spanish yet, you can use internet translation services like Yahoo Babelfish or Google Translate for translations. It is worth it! I am going to learn Spanish now because there is another world on the internet that speaks Espanol!

Have a joyful day!

Friday, April 2, 2010

Spring Break: Santa Cruz, Calif.


We spent Sunday of our 4 day weekend at Santa Cruz, Calif. Here is how a city boy goes to the beach. Behind him is the boardwalk with amusement park. Somewhere in that park my sons are testing every amusement ride. That gives us a few hours to relax on the beach.

Here is how an expert makes sunning on the beach look effortless.

(click pictures for larger image, then "back" key to return to blog)

I went for a walk. I was looking for color and shapes that I might use in weaving. Weaving is teaching me to look at things differently than I would in the past. Here is a creek that flows from the town and empties into the ocean. I wanted to save the colors of the greenery on the bluff. People are always interesting. In this one picture are a few smaller scenes that could be a subject. Especially that lighthouse on the right hand side. That lighthouse guards the entrance to the marina.


Turning to the right and looking out across the water, you can see many of the boats that came out of the marina and are now sailing Monterey Bay. The camera caught some sunlight on the lense which caused some uneveness in coloring, but I still like the color of sky, the people's clothes (like the little kid in red shorts and blue hat), and the dark shape of the land across the bay.


Turning a little more right and looking south, that is Monterey about 25 miles across the bay. I tried to capture the water color in the wave on the left. The kid with the football provides action, as does the couple on the right. The pier on the right is the wharf which has many shops and restaurants. You can rent fishing gear and fish off the pier. We took many pictures there but many are unusable for the blog.

Camera problems caused us to lose a bunch of pictures. Here is an example. This model of a boat was on the pier. Too blurry. I can still use the color reference and shape though. We bought a cheapie digital camera when the good camera died, but it was also hit and miss.


When we came back from the pier, there was a long haired surfer dude (we used to call them hippies) selling these handmade flowers he wove from palm leaves. So I bought one as a souvenir. He says in a few weeks it will start to turn brown and in a few months it will be completely dried out. Then it will stay that color. I can hardly wait.


More fooling around with the camera. The flash works! It's okay, my sunglasses are polarized.

In this photo it's my eyes that are polarized.

That's all for now.

Have a joyful day!