Sunday, July 4, 2010

Tessellation


While surfing the internet, I look for patterns that might work for weaving. This a pattern I created using a tessellation generator found at this website.

http://gwydir.demon.co.uk/jo/tess/tess.htm

It took a very short time and I think I could make some very nice patterns with more thinking about it.

I found this tessellation technique referenced on this website article
"Designing Tesselating Knitting Patterns"
http://blog.craftzine.com/archive/2010/07/designing_tessellating_knittin.html

I like looking in on Craftzine to see what crafters are up to.
http://craftzine.com/

Have a good day!
Add Video

Sunday, June 27, 2010

Backstrap Towels


I want to make some more towels with cotton yarn. I use the thick Sugar N Creme and Peaches and Cream yarns. The towels are part of my apprenticeship as a weaver.

Above are the sticks I'll be using for my backstrap loom. I plan to make two towels. The ends tied to the loom bars will be twined for a finished selvedge. I'll weave halfway through and turn the loom around and weave the other half. Then I'll cut in the middle. The towels will have three finished edges. The last edges will be hemstitched and fringed.


Using 24 inch hardwood sticks clamped to the chairs, the warp is wound at 56 inch. You can see a metal box that was jammed between the chair and table to keep the spacing constant. The tight continous warp wants to pull the chairs together. The sett will be 10 warp per inch. There is 6 inch of variegated pastel, then 4 inch of white in middle, and 6 inch more of pastel. The finished width will be 16 inch. And I put safety strings to hold the cross.


I'll twine my piece tomorrow, so I just rolled up the warp with the flat sticks and put it in the bag. I love this part of backstrap weaving. I was actually going to use a rigid heddle loom, but my heddle is missing! It's nice to have a backstrap loom as a backup loom!

Have a good day!

Sunday, June 6, 2010

Shelf Help

Today's entry is some pictures I took a six months ago. When we first moved into the condo, we have fewer closets than the last house. So my fiber stuff kind of piled up in the living room next to the television cabinet.

Here is my craft frame, my bag with a backstrap loom, the Cricket loom on a table, the empty Cricket box, bags of yarn, and boxes of stuff. Big mess!


So we went to IKEA and bought this 8 hole shelf unit for about $70. Then we bought six fabric baskets for $30. All the yarn and stuff went into the baskets. The Cricket loom on the folding table is just off to the left. The empty Cricket box is going to the outside storage unit.

This shelf unit has been a great place to organize yarns, hide tools and books. Even though the Cricket still sits out on the folding table when in use, having the other items out of sight is a big improvement. The craft frame hides behind the shelf unit when not in use.

We left the upper two holes open for displaying knick knacks. The top is good for displaying pictures.

This was definitely worth the expense. Having the extra storage in the condo is great. I like having it next to the television so I can grab stuff when I find myself with empty hands.

So that's it for now!
Have a good day!

Saturday, May 22, 2010

Luann's $3.50 Rectangle Loom


Luann's $3.50 Rectangle Loom - picture & text used by permission
(click picture for larger image)

I wanted to share this picture I received from Hand Prepared Fibers on yahoogroups
http://groups.yahoo.com/group/handpreparedfibers/message/38741

Luann says: This is what I have been doing today. I made a loom. The nails are 1/4 inch a part and it measure 32 x 16 inches. Not sure how big the piece will be when I take it off but I am hoping putting them together will make a nice table runner or maybe place mats. Rae, thank you so much for helping me with the dimensions on it. It's going to come out just right without adding the 1 extra nail. Don't ask me why.

I got a window at a yard sale for $1 and took out the glass and them trimmed one side with a table saw to even the sides. My husband did that for me. Then I stained it with walnut and the clear stuff. I wasn't sure I could do it or not but it came out right to my surprise. That's a lot of nails but I used a 1/16th inch Dremel tool (drill) to get the nail started so the wood wouldn't split.

The nails were $2.50 and I used all of them. Had the other stuff like a little 1/16th inch drill, hammer, stain, and that clear stuff you spray on the stain. I did all the staining the other day. So today all I had to do was put in the nails.

They are 1 inch finishing or panel nails. They have little ridges on them. They are black and you get them in a package in the hardware store. They come in other sizes too so be sure to get the 1 inch. The stand is also a handmade loom. I got it and a 7 foot tri loom for $100 a few years ago. - Luann

Thank you Luann!

Rectangle loom weaving and triangle loom weaving are generally done as continuous yarn weaving. It's a straightforward weaving technique that is often done with one yarn rather than separate warp and weft yarns. You can take the woven triangles or rectangles and sew them together to make larger pieces like shawls or table runners. Or you can make a larger loom and do one bigger piece.

Note: Panel nails come in different colors. I have seen comments recommending the use of black and white nails alternately to help keep track of warping. I will probably do that when I make one of these looms.

You can find files on making and using triangle and rectangle looms on the TriLoom yahoogroup
http://groups.yahoo.com/group/TriLoom/files/

You will have to join the above yahoogroups to see messages and files. To reduce spam, memberships have to be approved, but usually they are approved promptly. There is no charge to use those yahoogroups.

Or you can search for "triangle looms" and get a ton of hits.

Thank you again Luann for sharing that picture and info. $3.50 for a loom fits a lot of our budgets!

Have a good day!

Saturday, May 8, 2010

Peruvian Cross Rep Variations


Peruvian Cross Rep braid variations. There is something wrong with this picture. The last red cross is not covered by white on the outside. The pattern is supposed to be created by pulling the red yarn through the white yarn. On the last switch, I goofed and pulled the white yarn through the red.


Here is the braid again. The left side is correct. I pulled the red through the white. The right side is pulled through the red. Which is incorrect for this pattern. But look below.


A mistake done on purpose becomes a design feature. The braid begins with white covering the dark.

In the middle area, white covers red on left and red covers white on right, forming a pattern where red and white stripes meander down the braid together.

Then I reversed the pattern and red covers white on the bottom section of the braid.

Click here for Peruvian Rep braid

Click here for Peruvian Cross Rep braid

Have a good day!

Peruvian Rep Braid


Based on book by Alta Turner in "Fingerweaving: Indian Braiding",
this is the Peruvian Rep Braid, page 36.

(click here for Peruvian Cross Rep Braid) -(click pictures for larger image, back to return to blog)

Set up on a dowel from left to right, 4 dark, 4 dark, 4 dark, 12 light.

Pull left side 4 dark through shed of 8 dark and 12 white. Let it sit to the right.


Pull next group from left side of 4 dark through 4 dark and 12 white. Notice how the dark weaves through the white in an "over-under" process. Leave the dark to the right.


Pull the last group on left through the white group, again it is woven through the white. Leave the dark to the right.


Now we start going to the other side, pull 4 dark from the right side, through 8 dark and through 12 white. Leave it lay on the left. See how the dark weaves through the white.


Pull the next group of 4 dark through 4 dark and 12 white, weaving through, leaving the dark laying to the left.


The next group of 4 dark is woven through the white, leave the dark laying to the left.
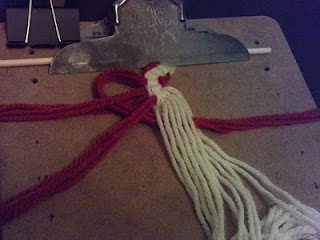

Starting back the other way.


Here is a shot of how I use my fingers to weave the strands and create the shed.


Here is the band forming with the river pattern. Please note that the dark yarn is always going through as weft. The light yarns are always woven over the top as warp.

You can join us on the yahoogroup Fingerweaving
http://groups.yahoo.com/group/FingerWeaving/


Have a good day!

Friday, May 7, 2010

Peruvian Cross Rep Braid


Peruvian Cross Rep Braid based on Alta Turner in "Fingerweaving: Indian Braiding" page 38
(click here for Peruvian Rep Braid) - (click picture for larger image, back to return to blog)

Set up 4 dark, 8 light, 4 dark


Take left dark 4 and weave through left white 4, let left dark 4 wait left of center.


Weave the right dark 4 through right light 4 and through left dark 4 to make the first cross in the middle. In this setup, the darks will be woven through the light except in the middle cross.


After snugging up the tension I'm ready for the next level.


Left dark is woven through the left light.


The dark right is woven through right light.


Right light is woven through left light.


Snug it up and you can see how the light yarn forms the pattern.


Once again left dark through left light, right dark through right light then through left dark cross.


Left dark woven through left light, right dark woven through right light, right light woven through center forms cross. Repeat until happy.

The light yarn can be thought of as the covering yarn, it usually goes over the dark yarn except in the middle cross where it covers itself.

The dark yarn is the covered yarn, usually covered by light yarn except in the middle cross where it covers itself.

Have a good day!